TypeScript: Using Backbone.Marionette and REST WebAPI (Part 2)
March 27, 2014 Leave a comment
This is Part 2 of an article that aims to walk the reader through setting up a Backbone.Marionette SPA application with Visual Studio 2013, and in particular, write Marionette apps using TypeScript.
As always, the full source code for this article can be found on github: blorkfish/typescript-marionette
Part 1 can be found here, and covered the the following:
- Setting up a Visual Studio 2013 project.
- Install required nuGet packages.
- Creating the ASP.NET HomeController and View.
- Including required javascript libraries in our Index.cshtml.
- Creating a Marionette.Application.
- Adding a Marionette Region
- Referencing the Region in the Application
- Creating a Marionette.View
- Using bootstrap to create a clickable NavBar Button
- Using Backbone Models to drive NavBar buttons.
- Creating a Backbone.Collection to hold multiple Models
- Creating a Marionette.CompositeView to render collections
- Rendering Model Properties in templates
- Using Marionette Events.
- In this part of the article, we will cover the following:
- Creating an ASP.NET WebAPI Data Controller.
- Unit testing the WebAPI Data Controller in C#
- Modifying the WebAPI Data Controller to return a collection of nested C# POCO objects.
- Defining TypeScript Backbone.Model classes to match our nested class structure.
- Writing Jasmine unit tests for our Backbone Collection.
- Creating a Marionette.CompositeView to render data in a bootstrap table.
- Using a Marionette.CompositeView as an ItemView
- Rendering nested Backbone.Collections
- Using CompositeView properties to generate html.
- Using bootstrap styles in a Marionette.CompositeView
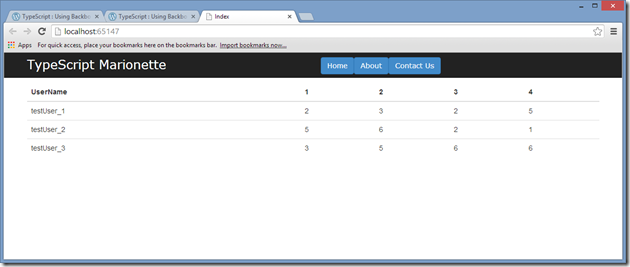
- When we are complete with this tutorial, we will have generated a nested Json structure as follows: UserList –> User –> RoundScores –> RoundScore.
- We will then render it as follows:
- So let’s get started.
Creating an ASP.NET WebAPI Data Controller.
Creating an ASP.NET WebAPI Data Controller is just as simple as creating a normal MVC Controller. All we need to do is to derive our class from ApiController instead of Controller, and then specify what the url will be when calling this controller.
- The latter part is is accomplished by adding two attributes to a method call on our ApiController. These are the [Route] attribute – to specify the url, and a System.Web.Http attribute to specify whether this is a REST get, post or delete.
- Go ahead and create a file under the /Controllers directory named HomeDataController.
- Derive this class from ApiController ( in the System.Web.Http namespace ), and add a Route attribute, as well as an HttpGet attribute as in the code below :
using System.Collections.Generic;
using System.Net;
using System.Net.Http;
using System.Web.Http;

namespace typescript_marionette.Controllers
{
    public class HomeDataController : ApiController
    {
        [Route("api/dataservices")]
        [HttpGet]
        public HttpResponseMessage GetDataTable()
        {
            return Request.CreateResponse<IEnumerable<string>>(HttpStatusCode.OK, GetData());
        }

        public List<string> GetData()
        {
            return new List<string> {"test1", "test2"};
        }

    }
}
- There are a couple of things to note about the code above.
- Firstly, the [Route(“api/dataservices”)] attribute. This defines the route to our DataController function. So firing up a web-browser and pointing it to /api/dataservices will hit this DataController.
- Secondly the [HttpGet] attribute. This attribute defines the method signature as allowing REST GETs.
- Thirdly, the return type of HttpResponseMessage – and the return syntax : return Request.CreateResponse <type>. These two signatures will return data JSON when json is requested, or XML when xml is requested.
- Fourth, the HttpStatusCode.OK will return a success callback to any JavaScript calling code. Interestingly enough, throwing an Exception anywhere in the call stack will return an error callback to any JavaScript calling code. This is all built-in when using classes deriving from ApiController. Later on, we will create a Jasmine unit test to test our error callback – to make sure that we are handling errors correctly.
- Next, note that I have created a method public List<string> GetData(), where I could have simply created this List<string> within the GetDataTable() method directly. Splitting these methods will help us with unit-testing later on in the piece. One C# xUnit test will target the GetData() function, and then we will use Jasmine to unit-test the returned Json response in GetDataTable().
- Lastly, the IEnumerable<type> syntax. In the code sample above, we are simply returning a string type. But further down the line, we will define [Serializable] POCOs to return nested Json, such that returning IEnumerable<MyType> will return full MyType classes – as well as any child classes or collections defined – automatically transformed into Json or Xml. Cool, huh ?
- Unfortunately, firing up web-browser, and typing in the url /api/dataservices at this stage will not work. Using IE, you will get the very helpful error message “The webpage cannot be found”, with a 404 status:

Using Chrome, the error message is slightly more helpful: No HTTP resource was found that matches the request URI ‘http://localhost:65147/api/dataservices’.
This is down to one missing line of code. Navigate to the App_Start directory, and double-click on the WebApiConfig.cs file. Modify the code to call config.MapHttpAttributeRoutes() as shown below. This line of code is called on app startup, and simply traverses the code to find our [Http] and [Route] attributes – and then adds them to the Route Table.
namespace typescript_marionette
{
    public static class WebApiConfig
    {
        public static void Register(HttpConfiguration config)
        {
            config.MapHttpAttributeRoutes();

            config.Routes.MapHttpRoute(
                name: "DefaultApi",
                routeTemplate: "api/{controller}/{id}",
                defaults: new { id = RouteParameter.Optional }
            );
        }
    }
}
Firing up Chrome at this stage, and navigating to /api/dataservices will now generate the expected result : a string array with two entries : test1 and test2 :
I have always found that Chrome or Firefox is far easier to work with when manually testing DataControllers. IE for some reason does not have a default rendering engine for pure data. It always tries to download the json response – and then you need to select a program to view this data – which is terribly annoying.
So stick to any other browser except IE when manually testing DataControllers.
Unit-testing the WebAPI Data Controller in C#
Right, so what would a good Data Controller be without unit tests ?
As far as I understand, Hamlet D’Arcy is credited with the saying “[Without unit tests] You’re not refactoring, you’re just changing shit.”
So best we create some unit tests, before we start changing shit…
Personally, I have been using xUnit as a testing framework for some time now.
Add a new project to your solution called typescript-marionette-xunit. Make sure the project type is a Class Library:
Delete the Class1.cs file that is automagically created for you.
Now let’s add the nuGet packages for xUnit. To to Tools | Library Package Manager | Package Manager Console.
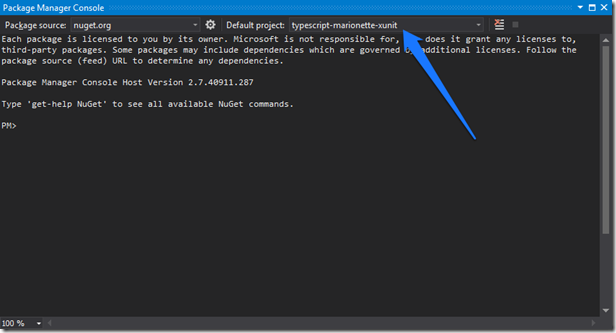
At the top of the screen, next to the Package source dropdown, there is a Default project dropdown. Make sure that you have selected the typescript-marionette-xunit project here :
Now install xunit as follows:
Install-Package xunit –Version 1.9.2
Install-Package xunit.extensions –Version 1.9.2
Next, add a reference to typescript-marionette project: Right-click on Refrences, Add Reference – then choose the typescript-marionette project under Solution Projects:
Now add a Controllers directory, and then a HomeDataControllerTests.cs class as follows:
namespace typescript_marionette_xunit.Controllers
{
    public class HomeDataControllerTests
    {
        [Fact]
        public void GetData_Returns_ListOfStrings()
        {
            HomeDataController controller = new HomeDataController();
            Assert.Equal(new List<string> {"test", "test"}, controller.GetData());
        }
    }
}
Running this unit-test will produce the following error:
Assert.Equal() FailurePosition:
First difference is at position 0
Expected: List<String> { "test", "test" }
Actual: List<String> { "test1", "test2" }
I firmly believe that you should always write a test that fails first, before modifying your code to make the test pass. Obviously this is as simple as changing the expected List<string> to be { “test1”, “test2” }.
Modifying the WebAPI Data Controller to return a collection of nested C# POCO objects.
It’s time now to get the DataController to return some real data. For the purposes of this article, lets assume we are wanting to return a list of users, and how they scored per round. The classes involved are as per the following class diagram:
Create a ResultsModels.cs file under the /Models directory, as follows:
namespace typescript_marionette.Models
{
    [Serializable]
    public class UserModel
    {
        public UserModel()
        {
            RoundScores = new List<RoundScore>();
        }
        public string UserName;
        public string RealName;
        public List<RoundScore> RoundScores;
    }

    [Serializable]
    public class RoundScore
    {
        public int RoundNumber;
        public int TotalPoints;
    }
}
Now, let’s modify the HomeDataController to return a list of these models. At the same time, we may as well define a new url (api/results) to return these results:
        [Route("api/results")]
        [HttpGet]
        public HttpResponseMessage GetUserResults()
        {
            return Request.CreateResponse<IEnumerable<UserModel>>
                (HttpStatusCode.OK, GetUserResultModels());
        }

        public List<UserModel> GetUserResultModels()
        {
            return new List<UserModel>
            {
                new UserModel { UserName = "testUser_1", RealName = "Test User No 1",
                    RoundScores =  new List<RoundScore>
                {
                      new RoundScore { RoundNumber = 1, TotalPoints = 2 }
                    , new RoundScore { RoundNumber = 2, TotalPoints = 3 }
                    , new RoundScore { RoundNumber = 3, TotalPoints = 2 }
                    , new RoundScore { RoundNumber = 4, TotalPoints = 5 }
                } },
                new UserModel { UserName = "testUser_2", RealName = "Test User No 2",
                    RoundScores =  new List<RoundScore>
                {
                      new RoundScore { RoundNumber = 1, TotalPoints = 5 }
                    , new RoundScore { RoundNumber = 2, TotalPoints = 6 }
                    , new RoundScore { RoundNumber = 3, TotalPoints = 2 }
                    , new RoundScore { RoundNumber = 4, TotalPoints = 1 }
                }  },
                new UserModel { UserName = "testUser_3", RealName = "Test User No 3",
                    RoundScores =  new List<RoundScore>
                {
                      new RoundScore { RoundNumber = 1, TotalPoints = 3 }
                    , new RoundScore { RoundNumber = 2, TotalPoints = 5 }
                    , new RoundScore { RoundNumber = 3, TotalPoints = 6 }
                    , new RoundScore { RoundNumber = 4, TotalPoints = 6 }
                }  }
            };
        }
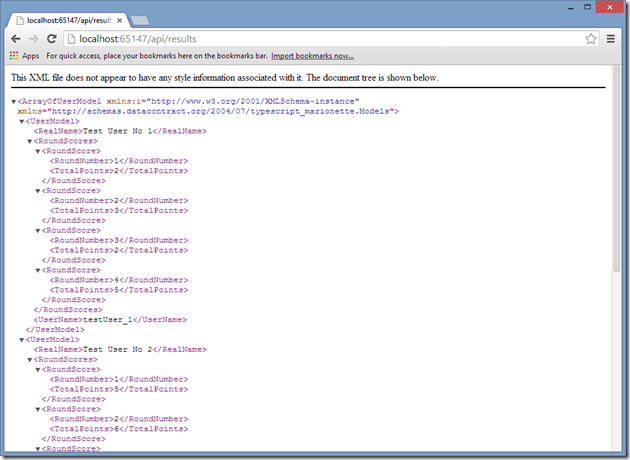
Now let’s fire up our application, and browse to /api/results ( using Chrome ) to see what we get:
Defining TypeScript Backbone.Model classes to match our nested class structure.
At this point, we will need some Backbone.Model classes and a Backbone.Collection to retrieve data from our /api/results url. Backbone.Collections have a very simple method of retrieving data from REST services – simply specify the url property. As an example, if we were to modify the NavBarButtonCollection (that we created in Part 1) to load data from REST services, we would do the following:
class NavBarButtonCollection extends Backbone.Collection {
    constructor(options?: any) {
        super(options);
        this.model = NavBarButtonModel;
        this.url = "/api/navbars";
    }
}
So let’s create some Backbone.Models to emulate the C# POCO class structure for UserModel and RoundScore that we built in C#. The trick here is to use TypeScript interfaces to define the relationships. In the /tscode/models directory, create a new TypeScript file named UserResultModels.ts. For simplicity, I have included the interfaces and Models in the same TypeScript file. The interface definitions for the returned Json objects are shown below. Note how we are defining the nested properties as arrays [ ]. Also, the property names must match exactly the C# POCO property names.
interface IRoundScore {
    RoundNumber?: number;
    TotalPoints?: number;
}

interface IUserModel {
    UserName?: string;
    RealName?: string;
    RoundScores?: IRoundScore [];
}
Next, we create the Backbone.Model class based on these interfaces. Note that the ES5 property getters and setters match the signatures of the interfaces.
class RoundScore extends Backbone.Model implements IRoundScore {
    get RoundNumber(): number { return this.get('RoundNumber'); }
    set RoundNumber(value: number) { this.set('RoundNumber', value); }

    get TotalPoints(): number { return this.get('TotalPoints'); }
    set TotalPoints(value: number) { this.set('TotalPoints', value); }

    constructor(input: IRoundScore) {
        super();
        for (var key in input) {
            if (key) { this[key] = input[key]; }

        }
    }
}

class UserModel extends Backbone.Model implements IUserModel {
    get UserName(): string { return this.get('UserName'); }
    set UserName(value: string) { this.set('UserName', value); }

    get RealName(): string { return this.get('RealName'); }
    set RealName(value: string) { this.set('RealName', value); }

    get RoundScores(): IRoundScore[] { return this.get('RoundScores'); }
    set RoundScores(value: IRoundScore[]) { this.set('RoundScores', value); }

    constructor(input: IRoundScore) {
        super();
        for (var key in input) {
            if (key) { this[key] = input[key]; }

        }
    }
}
Now to create our collection: ( again in /tscode/models/UserResultModels.ts )
class UserResultCollection extends Backbone.Collection {
    constructor(options?: any) {
        super(options);
        this.model = UserModel;
        this.url = "/api/results";
    }
}
As a quick test of this collection, lets load it in our MarionetteApp as a variable. Note that we have specified a property to the fetch({ async: false }) function of the UserResultCollection . This property will halt execution of the calling thread (not asynchronous) until the collection is loaded. In general, it is better practise NOT to specify this parameter, unless absolutely neccesary. the initializeAfter() function in MarionetteApp.ts is shown below:
    initializeAfter() {
        var navBarButtonCollection: NavBarButtonCollection = new NavBarButtonCollection(
            [
                { Name: "Home", Id: 1 },
                { Name: "About", Id: 2 },
                { Name: "Contact Us", Id: 3 }
            ]);

        var navBarView = new NavBarCollectionView({ collection: navBarButtonCollection });

        navBarView.on("itemview:navbar:clicked", this.navBarButtonClicked);

        this.navbarRegion.show(navBarView);

        var resultsCollection = new UserResultCollection();
        resultsCollection.fetch({ async: false });
    }
Before trying to debug this code, don’t forget to include the UserResultModel.js file in our Views/Home/Index.cshtml file:
    <script language="javascript" type="text/javascript" src="../../tscode/models/NavBarButtonCollection.js"></script>
    <script language="javascript" type="text/javascript" src="../../tscode/models/NavBarButtonModel.js"></script>

    <script language="javascript" type="text/javascript" src="../../tscode/models/UserResultModels.js"></script>
Setting a breakpoint after the collection is loaded, and checking the resulting resultsCollection variable in Visual Studio should show that we have successfully loaded the json returned from our REST ApiController:
But debugging and manually verifying that our collection is loaded correctly is just what it is : manual. And manual is time-consuming, error-prone and just a pure pain. So let’s write a unit-test to verify that our model is loading correctly from the C# DataController.
Unit testing the Backbone Collection with jasmine
To setup a unit test for our UserResultCollection, we will create a web-page named SpecRunner.html. This is a simple web-page that just includes all of our required .js files, and then calls jasmine.execute().
Firstly, create a /tscode/test directory – then add an html page to this directory named SpecRunner.html. This file is very similar to /Views/Home/Index.cshtml, and should also include the meta tag http-equiv for IE. Simply copy the <head> section from Index.cshtml. As well as including all of our source .js files, we will also need to include /scripts/jasmine.js, , /scripts/jasmine-html.js, and also the /css/jasmine.css file as follows:
<!DOCTYPE html>

<html>
<head>
    <meta http-equiv="X-UA-Compatible" content="IE=edge">
    <title>Index</title>

    <link rel="stylesheet" href="../../Content/bootstrap.css" type="text/css" />
    <link rel="stylesheet" href="../../Content/app.css" type="text/css" />

    <script language="javascript" type="text/javascript" src="../../Scripts/jasmine.js"></script>
    <script language="javascript" type="text/javascript" src="../../Scripts/jasmine-html.js"></script>
    <script language="javascript" type="text/javascript" src="../../Scripts/jasmine-jquery.js"></script>

    <script language="javascript" type="text/javascript" src="../../Scripts/jquery-1.9.1.js"></script>
    <script language="javascript" type="text/javascript" src="../../Scripts/json2.js"></script>
    <script language="javascript" type="text/javascript" src="../../Scripts/underscore.js"></script>
    <script language="javascript" type="text/javascript" src="../../Scripts/backbone.js"></script>
    <script language="javascript" type="text/javascript" src="../../Scripts/backbone.marionette.js"></script>
    <script language="javascript" type="text/javascript" src="../../Scripts/bootstrap.js"></script>

    <script language="javascript" type="text/javascript" src="../../tscode/MarionetteApp.js"></script>

    <script language="javascript" type="text/javascript" src="../../tscode/views/NavBarItemView.js"></script>
    <script language="javascript" type="text/javascript" src="../../tscode/views/NavBarCollectionView.js"></script>

    <script language="javascript" type="text/javascript" src="../../tscode/models/NavBarButtonCollection.js"></script>
    <script language="javascript" type="text/javascript" src="../../tscode/models/NavBarButtonModel.js"></script>

    <script language="javascript" type="text/javascript" src="../../tscode/models/UserResultModels.js"></script>
</head>
<body>
    <script type="text/javascript">
        var jasmineEnv = jasmine.getEnv();
        jasmineEnv.addReporter(new jasmine.HtmlReporter());
        jasmineEnv.execute();
    </script>
</body>
</html>
Note that the jasmine-jquery.js file is not included via the nuGet package for jasmine-js. You will need to download the file from here [ jasmine-jquery-1.3.1.js ] – and then save it into your /Scripts directory.
To run this file, simply right-click on it, and select the menu option Set As Start Page, and then hit F5 to debug. But don’t do it yet – if you do – you will end up with a blank page. Why ? Well, we havn’t written any jasmine tests yet.
Writing Jasmine unit tests for our Backbone Collection.
In the /tscode/test directory, create a directory named models. Now create a TypeScript file for our UserResultCollection tests named UserResultCollectionTests.ts. , and include the reference paths for our definition files at the top.
Jasmine tests all fall within a describe(‘ test suite name ’, () => { .. tests go here … }) block – which defines the test suite name. Within this describe function, each test is defined with the syntax it(‘ test description ‘ , () => { test goes here… }) function as follows:
/// <reference path="../../../Scripts/typings/jquery/jquery.d.ts"/>
/// <reference path="../../../Scripts/typings/underscore/underscore.d.ts"/>
/// <reference path="../../../Scripts/typings/backbone/backbone.d.ts"/>
/// <reference path="../../../Scripts/typings/marionette/marionette.d.ts"/>
/// <reference path="../../../Scripts/typings/jasmine/jasmine.d.ts"/>
/// <reference path="../../../Scripts/typings/jasmine-jquery/jasmine-jquery.d.ts"/>

describe('/tscode/test/models/UserResultCollectionTests.ts ', () => {

    it('should fail', () => {
        expect('undefined').toBe('defined');
    });

});
Now, just include the generated .js file in your SpecRunner.html file:
    <script language="javascript" type="text/javascript" src="../../tscode/models/NavBarButtonCollection.js"></script>
    <script language="javascript" type="text/javascript" src="../../tscode/models/NavBarButtonModel.js"></script>

    <script language="javascript" type="text/javascript" src="../../tscode/models/UserResultModels.js"></script>
    <script language="javascript" type="text/javascript" src="./models/UserResultCollectionTests.js"></script>
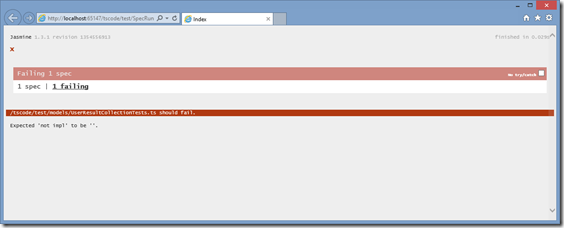
Running the app now ( F5 ) should show the results of the jasmine tests:
Ok, now that we have Jasmine up and running, lets write some unit tests for our UserResultCollection. Jasmine has two functions – beforeEach() and afterEach() that will run before each test, and after each test to perform initialization. In beforeEach(), we setup our collection, and then we can re-use it in each of our tests as follows:
describe('/tscode/test/models/UserResultCollectionTests.ts ', () => {

    var userResultCollection: UserResultCollection;

    beforeEach(() => {
        userResultCollection = new UserResultCollection();
        userResultCollection.fetch({ async: false });
    });

    it('should return 3 records from HomeDataController', () => {
        expect(userResultCollection.length).toBe(3);
    });

});
To find a specific instance in this collection, we can use the underscore.js functions where() and findWhere(). where() will return a collection where all elements match the criteria, and findWhere() will return a single Model in our collection that matches the selection criteria:
    it('should find 1 UserModel with Name testUser_1', () => {
        var userModels = userResultCollection.where({ UserName: 'testUser_1' });
        expect(userModels.length).toBe(1);

    });

    it('should return a UserModel with Name testUser_1', () => {
        var userModel = userResultCollection.findWhere({ UserName: 'testUser_1' });
        expect(userModel).toBeDefined();
    });
Jasmine tests can also be nested. This means that we can describe( ) a set of tests that will use the parent’s beforeEach() and afterEach() functions to run the tests. In this describe() block, we can also create beforeEach() functions. This provides us with a handy way of testing a single model within the userResultCollection:
    it('should return a UserModel with Name testUser_1', () => {
        var userModel = userResultCollection.findWhere({ UserName: 'testUser_1' });
        expect(userModel).toBeDefined();
    });

    // this describe block is nested inside our main describe block
    describe(' UserModel tests ', () => {
        var userModel: UserModel;
        beforeEach(() => {
            // the userResultCollection is setup in the parent beforeEach() function
            userModel = <UserModel> userResultCollection.findWhere({ UserName: 'testUser_1' });
        });

        it('should set UserName property', () => {
            expect(userModel.UserName).toBe('testUser_1');
        });

        // check that we are getting an array for our nested JSON objects
        it('should set RoundScores property', () => {
            expect(userModel.RoundScores.length).toBe(4);
        });
    });
Now lets use the same technique to get the third RoundScore model from the array of RoundScores for this UserModel;
        // check that we are getting an array for our nested JSON objects
        it('should set RoundScores property', () => {
            expect(userModel.RoundScores.length).toBe(4);
        });

        // nested describe block re-uses the userModel set in parent beforeEach()
        describe('RoundScore tests', () => {
            var roundScore: RoundScore;
            beforeEach(() => {
                roundScore = <RoundScore> userModel.RoundScores[2]; // get the third RoundScore
            });

            it('should have RoundNumber set to 3', () => {
                expect(roundScore.RoundNumber).toBe(3);
            });
            it('should have TotalPoints set to 2', () => {
                expect(roundScore.TotalPoints).toBe(2);
            });
        });
Creating a Marionette.CompositeView to render the Backbone Collection in a table.
So we are now confident that our Backbone Collection is working correctly. Next step is to create a Marionette.CompositeView to render this collection in a table. In the /tscode/views directory, create a new TypeScript file named UserResultViews.ts. Once again, extend from Marionette.CompositeView, and set the options.template property:
class UserResultsView extends Marionette.CompositeView {
    constructor(options?: any) {
        if (!options)
            options = {};
        options.template = "#userResultsViewTemplate";
        super(options);
    }
}
Next, update the Index.cshtml to provide an html snippet that matches the options.template property (#userResultsViewTemplate) above. While we are at it, lets also create a new Marionette Region for our UserResultView to render into. Modify the Index.cshtml as follows. Don’t forget to include the new JavaScript file in the <head> element.
<script language="javascript" type="text/javascript" src="../../tscode/views/UserResultViews.js"></script>
        <div class="container"> @* wrap the row with a container *@
            <div class="row">
                <div class="col-lg-12">
                    @*<h1>Hello Home Controller</h1> // old code *@
                    <div id="userResultRegion"></div> @*  new region  *@
                </div>
            </div>
        </div>

        @*  new template  *@
        <script type="text/template" id="userResultsViewTemplate">
            This is the userResultsViewTemplate.
        </script>
Next, we create need to modify our MarionetteApp to include the new region, create a UserResultView, and show this view in the region:
class MarionetteApp extends Marionette.Application {
    navbarRegion: Marionette.Region;
    userResultRegion: Marionette.Region; // new region
    constructor() {
        super();
        this.on("initialize:after", this.initializeAfter);
        this.addRegions({ navbarRegion: "#navbarRegion" });
        this.addRegions({ userResultRegion: "#userResultRegion" }); // new region
    }
    initializeAfter() {
        var navBarButtonCollection: NavBarButtonCollection = new NavBarButtonCollection(
            [
                { Name: "Home", Id: 1 },
                { Name: "About", Id: 2 },
                { Name: "Contact Us", Id: 3 }
            ]);
        var navBarView = new NavBarCollectionView({ collection: navBarButtonCollection });
        navBarView.on("itemview:navbar:clicked", this.navBarButtonClicked);
        this.navbarRegion.show(navBarView);

        var userResultView = new UserResultsView(); // create the new view
        this.userResultRegion.show(userResultView); // show the view
    }
    navBarButtonClicked(itemView: Marionette.ItemView, buttonId: number) {
        alert('Marionette.App handled NavBarItemView clicked with id :' + buttonId);
    }
}
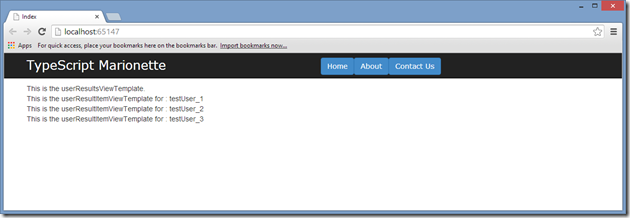
If all goes well, we should see the new template displayed on the page:
Using a Marionette.CompositeView as an ItemView:
Now that we have the top-level view rendering correctly, lets create another CompositeView to serve as the view for each user in our UserResultCollection. Simply create another CompositeView named UserResultItemView, give it a template, and then set the parent itemView property to the new class name as follows:
class UserResultsView extends Marionette.CompositeView {
    constructor(options?: any) {
        if (!options)
            options = {};
        options.template = "#userResultsViewTemplate";
        super(options);
        this.itemView = UserResultItemView; // set the child view here
    }
}

// new ItemView class
class UserResultItemView extends Marionette.CompositeView {
    constructor(options?: any) {
        if (!options)
            options = {};
        options.template = "#userResultItemViewTemplate"; // new template
        super(options);
    }
}
Next, create the html for userResultItemViewTemplate in the Index.cshtml:
        <script type="text/template" id="userResultItemViewTemplate">
            This is the userResultItemViewTemplate for : <%= UserName %>
        </script>
Finally, construct and fetch a new UserResultCollection in the MarionetteApp, and pass this collection to the UserResultsView:
        var userResultCollection = new UserResultCollection();
        userResultCollection.fetch({ async: false });

        var userResultView = new UserResultsView({ collection: userResultCollection }); // pass in the collection
        this.userResultRegion.show(userResultView);
Running our app now will render an item for each element found in our UserResultCollection:
Rendering nested Backbone.Collections.
Cool. So now we need another ItemView to render our RoundScores per user ( this is the nested collection within our Users collection.. All we need is a ResultItemView to render a single RoundScore, then set the parent itemView property to our new child view, exactly as we did before. Remember to create an html template in our Index.cshtml a well:
class UserResultItemView extends Marionette.CompositeView {
    constructor(options?: any) {
        if (!options)
            options = {};
        options.template = "#userResultItemViewTemplate";
        super(options);
        this.itemView = ResultItemView; // set the child view here
    }
}

// new ResultItemView class
class ResultItemView extends Marionette.ItemView {
    constructor(options?: any) {
        if (!options)
            options = {};
        options.template = "#resultItemViewTemplate"; // new template
        super(options);
    }
}
Index.cshtml:
        <script type="text/template" id="resultItemViewTemplate">
            This is the resultItemViewTemplate
        </script>
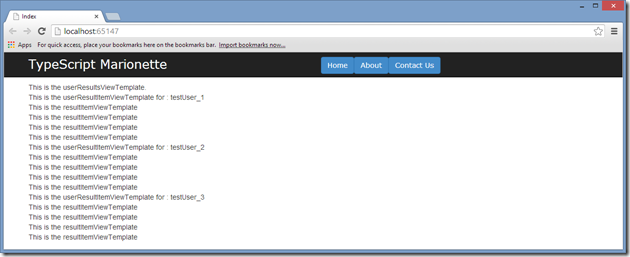
Running our app now should show three ResultItemView s per user, right ?
Ok, so what went wrong ?
In order to use an ItemView, the composite view needs it’s collection property set correctly. Remember that when we instantiated the top level view, we passed our collection in the constructor:
var userResultView = new UserResultsView({ collection: userResultCollection }); // pass in the collection
Each item in this collection creates a new instance of the UserResultItemView class, and passes it the model to render. So all we need to do is to set our collection property in the constructor, and create our own internal collection based on the incoming model. Before we do this, however, lets just create a quick collection to hold RoundScores. In /models/UserResultModels, create a new collection named RoundScoreCollection to hold RoundScore models as follows:
class RoundScoreCollection extends Backbone.Collection {
    constructor(options?: any) {
        super(options);
        this.model = RoundScore;
    }
}
Now we can modify the constructor of UserResultItemView to set the collection
class UserResultItemView extends Marionette.CompositeView {
    constructor(options?: any) {
        if (!options)
            options = {};
        options.template = "#userResultItemViewTemplate";
        super(options);
        this.itemView = ResultItemView;
        // set internal collection:
        this.collection = new RoundScoreCollection(options.model.RoundScores);
    }
}
Running the app now will render correctly:
Using CompositeView properties to generate html
One of the advantages of using Marionette.Composite views is the ability to control the rendered html. Let’s update our template html and Views to render results in a table.
Firstly, modify the html template for userResultsViewTemplate to create a <thead> and <tbody> as follows:
        <script type="text/template" id="userResultsViewTemplate">
            <thead>
                <tr>
                    <th>UserName</th>
                    <th>1</th>
                    <th>2</th>
                    <th>3</th>
                    <th>4</th>
                </tr>
            </thead>
            <tbody></tbody>
        </script>
Obviously, we need to wrap this html in a topmost <table> tag – and render our child views within the <tbody> html region. These two settings are made in the UserResultsView:
class UserResultsView extends Marionette.CompositeView {
    constructor(options?: any) {
        if (!options)
            options = {};
        options.template = "#userResultsViewTemplate";
        options.tagName = "table"; // outer tag
        options.itemViewContainer = "tbody"; // itemview container
        super(options);
        this.itemView = UserResultItemView;
    }
}
Now update the html template for userResultItemViewTemplate to wrap the UserName property in a <td> tag, and set the outer tagName for the UserResultItemView to <tr>:
        <script type="text/template" id="userResultItemViewTemplate">
            <td><%= UserName %></td>
        </script>
class UserResultItemView extends Marionette.CompositeView {
    constructor(options?: any) {
        if (!options)
            options = {};
        options.template = "#userResultItemViewTemplate";
        options.tagName = "tr"; // outer tagname
        super(options);
        this.itemView = ResultItemView;
        this.collection = new RoundScoreCollection(options.model.RoundScores);
    }
}
Finally, update the html resultItemViewTemplate to render TotalPoints in a div, and update the tagName to use <td>:
        <script type="text/template" id="resultItemViewTemplate">
            <div><%= TotalPoints %></div>
        </script>
class ResultItemView extends Marionette.ItemView {
    constructor(options?: any) {
        if (!options)
            options = {};
        options.template = "#resultItemViewTemplate";
        options.tagName = "td"; // outer tagname
        super(options);
    }
}
Running our app now will create a table as follows:
Using bootstrap styles in a Marionette.CompositeView
Finally, lets add some classes to our CompositeView to use bootstrap styles to render the table. Update the UserResultsView and specify the className property:
class UserResultsView extends Marionette.CompositeView {
    constructor(options?: any) {
        if (!options)
            options = {};
        options.template = "#userResultsViewTemplate";
        options.tagName = "table";
        options.className = "table table-hover"; // inject a class
        options.itemViewContainer = "tbody";
        super(options);
        this.itemView = UserResultItemView;
    }
}
Running the app now gives us our final result. Rendered html based on nested Json from a WebAPI DataController:
And that wraps it up.
Have fun,
blorkfish.
